
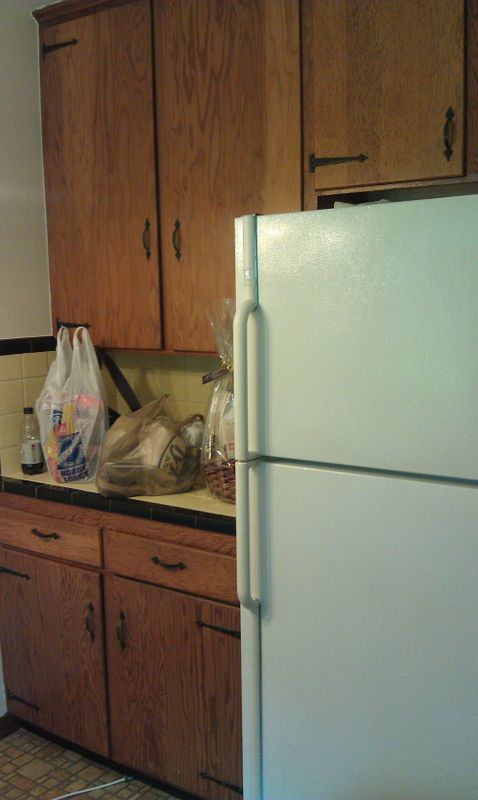

Not exactly a room where I wanted to spend a lot of my time. The floors were dingy linoleum that would never get clean, not matter how many times they were scrubbed. The oak cabinets were in great shape, but the color made the whole room dark. There was a random empty space in the corner by the stove. And that tile work... I just have no words for that bumble bee tile.

Here was our original list to accomplish in the kitchen:
- Paint the cabinet boxes white
- Add beadboard and molding to the cabinet doors
- Replace hardware on cabinets
- Tile over the linoleum
- Build in a new cabinet in the corner by the stove
- Reface the counter tops somehow
- Paint the trim and doors white
- Change the light fixtures: both the main light and the lights over the sink
- Paint the walls
- Add another prep area on the empty wall (Not shown, but it is located to the left as you walk in the door in the first picture.)
So lets get started!
First, we had to prep the cabinets for painting. This involved wiping down the cabinets several times, remove the old hardware, fill in the holes, and sand them smooth. We were adding hardware that had different hole placement, which is why we had to fill the original holes. It was a lot of work to prep them and we hadn't even started painting yet!


 Because I was nervous about using chemical products (mostly because they said to not use them on more than a 3x3 area due to the fumes...yikes!), I started researching alternative ways to remove the tar. Through this search, I read an article about how steam will help you scrape it up and recommended a wallpaper steamer. We went out and bought one for $50 at Home Depot and got to work. Three hot and sweaty evenings later, hubby finished the floor.

 After the floors, we tackled building a cabinet in the corner. My dad found a corner cabinet that would fit in the space, but it was an upper cabinet. The guys built a base for the cabinet to raise it up so the bottom of the cabinet was at the same level as the bottom of our other cabinets. We knew it would be a little bit stepped down at the counter level, but we decided it would work. The other problem to solve was a seven inch gap that would be left between the stove and the corner cabinet. I suggested that we build an open cabinet for my pans to slide into. It was a great idea, if I do say so myself, and wonderfully executed by the guys!
Our final project in this stage of the kitchen project was to reface the counter tops. We decided to keep the existing counters as it would be too expensive for our budget to replace them at this point, especially because we would ideally put in granite. We found the Formica board at Lowes that looked granite-like. We cut it to fit each area of the counter.


As you can see, we also found an island to fit in the blank wall space. It was originally a cart, but we did not put on the wheels and it works perfectly as another prep space.
The other bonus we added was an over the range microwave. We had been planning to add one at some point in the future because of how expensive they are. My dad found one on Craigslist for $90 (!!!) so we lunged for it!
We changed out the lights over the sink for these gorgeous red pendants! We also replaced the main light fixture which isn't shown in this picture with a track light fixture that we spray painted with oil rubbed bronze to match the cabinet hardware.

Thus ended phase 1 of the kitchen remodel. At this point it had been almost three months of living in chaos. The kitchen boxes were piled in the dining room and the living room, so the living room boxes were piled in the third bedroom. We also didn't want our house to be a mess for the holidays. Therefore, we took a break from the end of October through the new year. We finally started back up in April when I found a pin on Pinterest about using bonding primer to paint tile. I was so excited because although I loved all the updating we had done so far, the yellow and black back splash was still an eye sore. I was so excited that we went to the store that weekend and bought the primer and high gloss paint.

 I was pleasantly surprised at the outcome. It is so much crisper and bright (and this picture is with just the primer!) The great thing about this primer is that it requires no sanding and you can paint regular latex paint over it! If you are painting bathroom tile, you have to put a sealing coat on it to protect the paint from moisture. We decided to do several coats of Water-Based Polyurethane to help the tile clean up easily and add extra shine.
I knew what would finish it off would be to finally paint the walls. We don't think the walls had been painted in at least ten years and next to the crisp white of the cabinets and now the tile, the dingy white walls had to go. Fortunately we had gotten a free quart of paint from Ace and I had chosen to go with the color "Honey Pot" for the kitchen.

Our list was officially complete, but we weren't done yet! We had two final projects that added a touch of luxury in my eyes. The first project was adding a spice rack by the stove. There was this square of empty space that wasn't being used. We bought spice racks from Ikea and cut them to fit on the side of the cabinet. We added decorative molding to make it look more like a cohesive unit. I bought spice jars from Ikea as well, filled them up, and labeled them. I am so much happier with my spices on a spice rack than in the cabinet.


Isn't it beautiful! I would love to know what you think of all of our hard work while I leave you with one more picture of my favorite space in the kitchen:


After all of the prep work was finished, my mom and dad came over for the weekend to help us with the painting. My mom and I painted the cabinet boxes. While we were at it, we painted the trim and doors.


Meanwhile, my dad and hubby were outside working on adding the beadboard and molding to the cabinet doors. We initially were on the fence about the beadboard, but when we tried to paint the cabinet doors, the paint would not take in the areas that we sanded down to the original wood which made our decision for us. I am so happy we went for the beadboard!
 |
| Look at my handsome hubby with that saw! |

After we got all the beadboard on the cabinets, I fell in love with the look. I had been afraid that it would take the kitchen too country, but I felt it added a "southern" quality without looking like there should be rooster statues. It took us three weekends (and even longer before all the hardware was on and the doors were hung) but take a look at how cabinet doors look now:

After we finished the cabinets, we tackled the floor. We originally planned to tile over the linoleum with slate. My dad came over to help us as he has experience tiling. While the guys started prepping the floor, I was sent to the store for a part. When I got back, I found that they had made an exciting discovery. When my hubby pulled up the threshold between the kitchen and the hallway, he found wood. He couldn't tell from that small area if it was a sub floor or unfinished hard wood floors, so he pulled back some more of the linoleum:

We have hard wood floors! So we began the labor intensive process of pulling out the linoleum. Once we got it up, the floor was covered in the old tar that was the adhesive for the linoleum.


 Because I was nervous about using chemical products (mostly because they said to not use them on more than a 3x3 area due to the fumes...yikes!), I started researching alternative ways to remove the tar. Through this search, I read an article about how steam will help you scrape it up and recommended a wallpaper steamer. We went out and bought one for $50 at Home Depot and got to work. Three hot and sweaty evenings later, hubby finished the floor.
Next, we rented a floor sander from Home Depot and started sanding. Hubby did most of the sanding work, but I took a turn. That tool was just a too big for me, so I left him to it.

We did try staining the floors ourselves, but the stain turned out more black than a warm brown tone. So we decided to bring in the professionals for this one and we LOVE how they turned out. They ended up mixing a custom stain color just for us using two Minwax colors. I am so in LOVE with my floors!
 |
| See my beautiful floors! |
 After the floors, we tackled building a cabinet in the corner. My dad found a corner cabinet that would fit in the space, but it was an upper cabinet. The guys built a base for the cabinet to raise it up so the bottom of the cabinet was at the same level as the bottom of our other cabinets. We knew it would be a little bit stepped down at the counter level, but we decided it would work. The other problem to solve was a seven inch gap that would be left between the stove and the corner cabinet. I suggested that we build an open cabinet for my pans to slide into. It was a great idea, if I do say so myself, and wonderfully executed by the guys!
Our final project in this stage of the kitchen project was to reface the counter tops. We decided to keep the existing counters as it would be too expensive for our budget to replace them at this point, especially because we would ideally put in granite. We found the Formica board at Lowes that looked granite-like. We cut it to fit each area of the counter.


As you can see, we also found an island to fit in the blank wall space. It was originally a cart, but we did not put on the wheels and it works perfectly as another prep space.
The other bonus we added was an over the range microwave. We had been planning to add one at some point in the future because of how expensive they are. My dad found one on Craigslist for $90 (!!!) so we lunged for it!
We changed out the lights over the sink for these gorgeous red pendants! We also replaced the main light fixture which isn't shown in this picture with a track light fixture that we spray painted with oil rubbed bronze to match the cabinet hardware.


I knew what would finish it off would be to finally paint the walls. We don't think the walls had been painted in at least ten years and next to the crisp white of the cabinets and now the tile, the dingy white walls had to go. Fortunately we had gotten a free quart of paint from Ace and I had chosen to go with the color "Honey Pot" for the kitchen.


The other project was so exciting and pure luxury. We installed a tablet mount under the cabinet. I make a lot of recipes off of blogs and other sites on the web so this allows me to display the recipes so I can easily see them. I will be adding a recipe app and upload all the recipes that I use to the tablet. I also use it to listen to music via Pandora or watch Netflix while I work on a bigger project such as my truffles or candy making.

After all of our work, our kitchen is finally finished! (For now!) We are completely pleased with the results! Drum Roll please....


Have an inspired day!
Kelsey Noll
Love your kitchen:) gorgeous!!!!
ReplyDeleteHi! This is super out of the blue and you don't know me. haha. But your dad is my doctor and he started talking to me about you because my name is also Kelsey Elizabeth! My husband and I just moved here from California (brand new newlyweds ;). Your dad gave me your blog name and I love it, I can't believe you re-did your kitchen yourselves! My dream is also to find up a gem and fix it up diy style. Thanks for the inspiration! (ps. your Jane Austen reference cracked me up, I'm also a die hard Austen fan and basically my wedding was P&P themed. haha)
ReplyDeleteHi! That is so cool to "meet" you as apparently we share much in common! My husband is from Southern California! I looked at your blog post about your wedding and LOVE your Jane Austen quotes! We are slowly bringing the sparkle back to our gem... diy style. If you haven't heard of them you should check out Young House Love. They are on their 3rd home that they are redoing completely themselves and sharing it in the blogosphere. (They also have a book with great tips!) Nice to "meet" you out here in blog land. It would be fun to meet you in person someday when we are visiting my parents.
Delete